Growing marijuana indoors
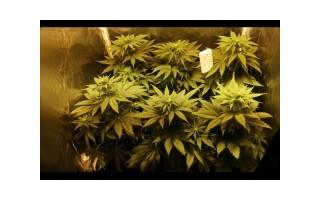
Indoor cannabis cultivation is becoming more and more common, because of its discretion and because it allows to grow marijuana all year round.
How to grow marijuana indoors?
This is one of the questions that many beginners ask themselves, in this manual of culture we will try to clear up your doubts.
To be able to cultivate marijuana plants indoors, it is necessary to create a microclimate, to adapt a temperature, humidity and air renewal in the space of culture so that they can grow and develop to the maximum of their potential, with the passing of the years the formulas and the systems to cultivate marijuana evolve more.
In our catalog of indoor cultivation you will find all the necessary material to adapt the necessary parameters and create your own self-cultivation.
Parámetros y condiciones para cultivar marihuana en interior:
GROWTH PHASEIllumination: 18 hours (light) / 6 hours (dark) |
FLOWERING PHASEIllumination: 12 hours (light) / 12 hours (dark) |
What material is needed to grow marijuana indoors?
First of all, we will need to create or buy a grow tent, in order to control more easily the air conditions and respect the hours of light and darkness, since in the dark phase they cannot be exposed to any type of light. Receiving any kind of light in the dark phase, either with a phone, lighter, flashlight, etc. could cause stress in plants and this could transform them into hermaphrodites, the only way to look or light the plants when they are in the dark phase is with a green light.
In Themariashop you will find grow tents of different sizes that will adapt to your growing space needs, from the smallest of 60 x 60cm to the largest of 240 x 120cm.
If you want to make your own grow tent we advise you to cover all the sides of the cabinet with reflective plastic Mylar paper, to obtain the maximum light diffusion in the crop..
Once chosen or manufactured the cabinet we must select the lighting kit that will depend on the area we want to illuminate, for small spaces we can use CFL bulbs (low consumption)and the larger the surface of the cabinet the more light power we will have to install to illuminate all the plants. In our online store you can find lighting kits prepared with different types of bulbs (in our blog you will find a post in which we explain the types of lamps for cultivation and with different types of reflector (basic stucco, basic smooth, cooltube, adjust a wings, etc.) Below you will find a table with the watts recommended by dimension.
In our online store you will find different lighting kits, with energy saving CFL bulbs (125w, 200w, 250w) and kits with sodium lamps in 250w, 400w and 600w.
Once the lighting system is installed, we will need a ventilation system that allows us to extract the heat emitted by the growing lamps and thus adjust the temperature in the growing area. For this we will need two air extractors, an extractor will allow to take out the hot air of the cultivation space and another extractor placed to the inverse that will make the function of intractor, it will allow that fresh and new air enters for our plants. So that this function of renewing the air in the cultivation area is correct, we will connect both the extractor and the intractor independently to an aluminum tube to send one the hot air to the outside or outside the room where we have our crop and the other is responsible for bringing fresh air from outside to the closet or growing area.
Next to the air extractors we will need to connect a flexible aluminum tube to conduct the air to the outside, on the web you will find 102mm, 127mm and 152mm.
|
And if you are more discreet or want to reduce the noise of the extractors, you will also find aluminum tubes covered with rock wool (Sonoconnect) that reduce the noise produced by the air from the outlet of the extractor to its evacuation to the outside.
|
Attention! The smell given off by marijuana plants in the flowering phase is very strong, if you want or need to reduce these odors you will need to connect an active carbon filter. The activated carbon filters are connected to the flexible aluminum tube and we will use it when the plants start to give off odor. The charcoal filter and the air extractor are placed inside the cabin and the flexible aluminum tube is in charge of taking the air to the outside (See image below).
We have different sizes of activated carbon filters, these must have the same diameter of mouth as the extractor and the same air flow.
|
There is another system to camouflage the odors of marijuana in indoor crops and also serves to support the carbon filter when they do not neutralize the smell emitted by the plants in its entirety, in our online store you will find Ona Gel is a product that gives off a fresh smell and does not harm the plants.
|
In indoor marijuana crops one of the most important factors is to control the temperature and humidity, in order to have an accurate control we will need as a fundamental piece a Thermo hygrometer. The Thermo hygrometer we will place it between the top of the plant and the lamp, if the indicated temperature exceeds 26Cº we will increase the distance between the reflector and the plants, if we do not have more height in the closet we will have to increase the air extraction flow. In our online store you will find several models of digital thermo hygrometers (with or without probe).
Tip: you can also help to lower the temperature by installing a fan to circulate more air, if it is not enough there are also reflectors such as cooltube or coolwings that connected to the extractors help to lower the temperature several degrees (depending on the power of the extractor).
Regarding humidity, if we do not cultivate in the correct parameters, the plant in the growth phase will grow slowly, which will lengthen the growth period and we will lose a lot of time and money, since the electricity consumption will be higher. As if this were not enough, another disadvantage is that the internodal spaces are longer, reducing the number of branches on the plants (which will make us lose in production). In this case we will have to adapt to the culture an air humidifier, it is a device that we will fill with water and will dispense a cold steam that together with a potentiometer will increase the humidity and will help to lower a little the temperature. In the case of excess humidity we will need a dehumidifier, this device is responsible for absorbing the moisture from the air turning it into liquid, (just the opposite of the humidifier). Pay a lot of attention during the flowering phase, an excess of humidity will cause the loss of the harvest due to brotrytis (a disease caused by fungi).
Once all the material is installed, we only need to choose the type of culture and substrate that we are going to use.
For cultivation in soil we will use square plastic pots of black color, for the first phase of the culture we will begin with pots of between 1 to 3 liters, and once more grown our plants we advise to transplant to a more comfortable pot, of a size of between 7 to 11 liters.
|
Once we have the pots, we will choose a good substrate, such as Light Mix or All Mix.
|
If you do not want to grow in soil, on the web you will find different complete hydroponic systems, such as the Wilma in which you can grow with expanded clay balls or rock wool.
|
Another of the most important parts of cultivation is plant nutrition, i.e. fertilizers and additives. The main and fundamental are the base fertilizers, for growth and for flowering. In the growth phase we could also use root stimulators and other additives that will help our plants to develop better and more easily. With the flowering phase it happens exactly the same, there are many stimulators and additives that together with the basic fertilizer will make your plants produce to the maximum!
Another factor to take into account is the control of the pH and EC of the water. Controlling and regulating the pH of the water will help your plants to better absorb the nutrients. Neutral pH (6.0 – 6.5) is ideal for cannabis plants.
On the other hand with the EC meter we will control at all times the nutrients that we provide to the plants, it measures the level of fertilizers in the water. In this way we will be able to provide our plants with the maximum amount of fertilizer and get the best performance.
How to place the material in the culture cabinet?
Here you have in pictures, step by step, the assembly of the material in a culture cabinet!
- Step 1: Mounting of the growing cabinet, the cabinet has three holes, one for the outlet of the extractor tube, another to introduce the intractor and another small one to pass the cables.
- Step 2: Assemble the air extractor and the flexible aluminum tube that will conduct the hot air to the outside, the direction of the air has to go as indicated by the arrow.
- Step 3: We will connect the active carbon filter to the extractor, Attention! This is the way to place it, but we will not use it until the flowering phase.
- Step 4: We will place the air intractor in the lower opening of the cabinet, and next to it a flexible aluminum tube that will introduce fresh air into the cabinet.
- Step 5: Connect the entire lighting system, first we place the pulleys (Easy Rollers), then we hang the aluminum reflector, pass the cables through the small hole to leave the transformer outside the cabinet and connect the cables.
- Step 6: We place the Thermo hygrometer and control the temperature, at this moment before placing the plants we will adjust the parameters of the crop. If it is too hot we will play with the speed of the extractor and the height of the bulb, if there is a lack of humidity we will place a humidifier and if there is too much humidity we will place a dehumidifier.
Once we have controlled the climate needed by the marijuana plants, we can start germinating the seeds.
- When the seeds are germinated, we will transfer them to the substrate (soil or rock wool).
- Once the first pair of leaves (cotyledons) have emerged, we will start the light cycle.
- When the plants reach the third floor of leaves, we will transplant them to a larger pot, approximately 3 liters. And we will begin to use the fertilizers and additives.
- We will make a last transplant before passing the plants to the flowering stage, this time we recommend that the pot is a minimum of 7 liters and the most suitable 11 liters.
- We will maintain the period of growth until reaching the desired height or convenient to the height of the crop, taking into account that the sativa varieties grow more in height than the indica varieties. The marijuana plants in flowering phase double their height; example: We change the light cycle from 18 hours to 12 hours, the plants grow 30 cm, at the end of flowering these plants can have reached 60 cm or more.

