How to grow autoflowering seeds outdoors
How to grow autoflowering seeds outdoors
You are thinking of growing autoflowering marijuana seeds outdoors, but you don’t know how to do it or you are looking for information to be able to carry out your crop. In our online grow shop we wanted to explain everything in detail.
Chart of contents:
- Why grow autoflowering seeds outdoors?
- Advantages of growing autoflowering seeds outdoors
- Disadvantages of growing autoflowering plants outdoors
- Growing autoflowering plants in pots or directly in soil
- When can autoflowering plants be planted outdoors?
- How to plant autoflowering plants outdoors step by step
6.1 Step 1: Choosing autoflowering seeds
6.2 Step 2: Germination of autoflowering seeds
6.3 Step 3: Prepare the soil or substrate
6.4 Step 4: Growing autoflowering plants
6.5 Step 5: Watering and fertilisers
6.6 Step 6: Flowering of autoflowering plants
6.7 Step 7: Bud maturation in autoflowering plants
6.8 Step 8: Root washing
6.9 Step 9: Harvesting
6.10 Step 10: Manicuring, drying and curing - Things to keep in mind when planting Autoflowering outdoors
Why grow autoflowering seeds outdoors?
Before growing autoflowering seeds outdoors, you should first ask yourself why grow autos and not photoperiods. To know the answer to that, you first need to know the differences between autos and photodependents, you can read about it in the post.
But if you don’t want to read about the differences between autoflowering and photodependent, here are the advantages and disadvantages of growing these seeds outdoors.
Advantages of growing autoflowering seeds outdoors
Growing autoflowering or automatic plants has become very popular, with many cannabis growers preferring to grow autoflowering cannabis outdoors. Growing autoflowering plants outdoors has many advantages, but they may or may not suit your needs.
- They are very fast plants: Growing autoflowering plants is very fast, a crop from start to finish usually lasts approximately 2 or 3 months (depending on the variety). This allows us to grow several crops during the season, harvesting before the cold and wet weather arrives or filling our larder well before September or October.
- Small plants: Autoflowering plants do not grow very tall, which is an advantage for those who want to grow on a balcony or be discreet, as they are much less visible or easy to camouflage.
- Easy to grow: Automatic strains are very easy to grow, ideal for novice growers, as they do not need high levels of fertiliser, are very fast and are less at risk from fungal diseases or insect pests.
- Cold-resistant: The fact that they are cold-resistant and fast plants means that they can be grown several times during the year, thus extending the outdoor season. In fact, we can grow autoflowering plants all year round, even in winter, but only in countries or areas where the temperature is above 15ºC.
Disadvantages of growing autoflowering plants outdoors
As we have said before, growing autoflowering plants may or may not suit your needs. But there are some small drawbacks to growing autoflowering plants. Like, for example:
- They cannot be cloned: When growing autoflowering plants, no cuttings can be taken.
- Less yield: If you are looking to make large harvests, then you should switch to photodependent seeds. One of the drawbacks of autos is that they produce very little. They are very fast and tiny, but you will never produce the same amount with an auto as with a photodependent marijuana plant.
- Less potent in THC: Autoflowering marijuana strains are less potent in THC than photodependent ones, although they have improved a lot and nowadays we can find strains with percentages over 23% THC.
Now that you know the advantages and disadvantages of growing autoflowering plants outdoors, you can decide whether you prefer to grow autos or photodependents.
If you want small and fast plants, without caring too much about yield or THC percentage, then autoflowering plants are ideal for you.
On the other hand, if you are looking for big plants with high yields and more THC potency, then you should grow feminised photodependent seeds.
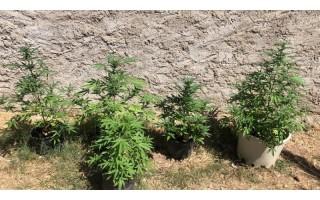
Growing autoflowering plants in pots or directly in soil
Many growers have this doubt when it comes to growing automatic plants, our advice is that, if you can grow them directly in soil, it is always better. But first you have to prepare the soil and make sure that the place where you put them has the maximum hours of light possible, because once planted in the ground you should not move them.
If we cannot grow them directly in soil, we should grow them in pots. It is important to know that autos do not like transplanting, so we should plant them in the definitive pot as soon as possible and avoid constantly changing pots. For outdoor pot growing, we advise to use white or brown pots, never use black pots. The size of the pot will influence the size of the plant, autoflowering plants stop growing once the roots are blocked, that is, if the roots touch the bottom of the pot, they will stop growing and start flowering. For this reason, we recommend using at least 18 litre pots, although the ideal would be to use 25 litre pots. It is very important to use a good substrate to obtain good results.
When can autoflowering plants be planted outdoors?
The good thing about autoflowering plants is that we can grow them almost all year round, as long as the temperatures allow it, remember that to grow autoflowering plants there must be a minimum temperature of 15 degrees centigrade. But it is true that we will obtain the best results in the months where the days are longer, the more hours of light there are, the higher the yields will be. In the northern hemisphere, the best months to grow autoflowering plants outdoors are May and June, as the days are longer and the temperatures are higher.
How to plant autoflowering plants outdoors step by step
Let’s get down to business, we already know a little more about growing autoflowering plants outdoors, now we are going to see how to grow autoflowering plants outdoors step by step.
Step 1: Choosing autoflowering seeds
It is very important to buy high quality autoflowering seeds, in our online grow shop we have a wide selection of the best autoflowering seeds from the best seed banks. In each variety you will find the characteristics and description, it is important that you look at the characteristics of the variety you want to grow, look well in the weeks of cultivation, THC, production, taste and effect.
Step 2: Germination of autoflowering seeds
Germinating autoflowering seeds is exactly the same as germinating any type of cannabis seed. Our advice is to use the wet paper towel method between two plates. I leave you the link to the post “How to germinate marijuana seeds“.
Step 3: Prepare the soil or substrate
If you grow directly in soil, you must prepare the soil well before you start cultivating. When we say prepare the soil, we mean carefully turning the soil to loosen it up and fertilising it, to make sure that our plants have the necessary nourishment during cultivation.
If we grow in pots, we recommend buying a good substrate, as they come fully prepared. We can use for example a Light mix or All mix from Biobizz, this type of substrate includes fertilizer and perlite that allows the substrate to be more aerated.
Step 4: Growing autoflowering plants
The growing phase of autoflowering plants outdoors usually lasts approximately 2 to 4 weeks, this will depend on the strain we grow and the amount of soil it has to grow in. As the growing time is relatively short, we must ensure that our plants are not lacking in anything, maximum sunlight exposure and use growth and root stimulators.
Step 5: Watering and fertilisers
When growing outdoors, our advice is to water first thing in the morning (between 7 and 8 a.m.). If we cannot do it during those hours, it is advisable to water when the sun goes down; it is not good to water during the hours when the sun is most intense, as this could burn the roots.
It is important that the irrigation water is of good quality, for this we must measure the water with a pH meter, in the event that the pH is too high, we must regulate the pH of the water, the ideal pH is 6 – 6.5. For more information on pH, you can consult our post “pH in marijuana crops“.
Autoflowering plants need less fertiliser, but you should still apply fertilizers to avoid deficiencies. During the first weeks of growth it is highly recommended to use root stimulators or mycorrhizae, this will make your plants develop a large amount of root mass, making them grow faster and healthier, as they will be able to consume nutrients better. If you use an All mix type substrate, you will not need to use growth fertiliser, as this substrate includes enough fertiliser for the first few weeks. However, during the flowering and fattening phase, we advise you to use flowering fertilisers and bud fatteners. If you use a Light Mix type substrate, we advise you to also use growth fertiliser, in this way you will ensure that your plants have all the necessary nutrients and thus avoid nitrogen deficiencies.
Step 6: Flowering of autoflowering plants
We will know that our plants are starting to flower when the first pistils (white hairs) start to appear. At that moment our plants will stop growing and start to form buds. It is important to give them the necessary nutrients for this stage, using a good flowering fertiliser will be decisive to increase production and avoid deficiencies.
Step 7: Bud maturation in autoflowering plants
As flowering progresses, the buds are formed and once formed, to fatten and mature. To do this we can use flowering stimulators and bud fatteners, which will help us to obtain larger harvests and harder, more compact buds filled with resin.
Step 8: Root washing
Root flushing is one of the most important parts of the crop, but this depends on whether you use biological or mineral fertilisers. In the case of using biological fertilisers, the root flushing will be quicker, it will be enough to stop applying fertilisers 3 or 4 days before harvest and carry out a small root flushing. On the other hand, when we cultivate with mineral fertilisers we will have to wash the roots more intensively. Here is a link to the post “End of cultivation: washing the roots“.
Step 9: Harvesting
The most awaited moment of cultivation has arrived, the harvest! After all the work and effort, the only thing left to do is to harvest our plants and dry them. But this process is very important and must be done well, otherwise we can ruin our entire harvest.
First we must identify the exact moment to harvest our plants, for this we must use a mini microscope to be able to see exactly the state of maturation of the trichomes. Once our plants are ready to harvest, we must cut the plants by the trunk from the bottom and put them to dry upside down, in a space where there is no light and is aerated. I invite you to read the article, “When to harvest marijuana plants”.
Step 10: Manicuring, drying and curing
If you have succeeded in growing successfully, congratulations! Remember that drying, tuning and storing will play a very important role in the aroma and flavour of your weed. I recommend you read about drying cannabis buds in detail on our blog.
Things to keep in mind when planting Autoflowering outdoors
- Autoflowering plants are very fast and are less at risk from pests and diseases, but that does not make them immune and the problem of your plants suffering from diseases or insect pests will waste valuable time on this type of crop, so our advice is to use preventative products.
- If the roots are hindered, growth is cut off. It is important that the substrate is light and airy, and that the size of the pot or hole in the ground is large enough for the roots to grow freely.
- Rooting will help your plants to grow vigorously and develop a good root mass during the first few weeks, which will help you to get better yields.
- Autoflowering varieties do not like transplants, the ideal for this type of plant is to germinate the seeds and plant them in jiffy’s or biodegradable pots, in this way we can plant them directly in the pot or definitive place without damaging the roots.
- Autoflowering marijuana strains need a lot of light, so it is ideal to take a good look at where you are going to grow them, where there are more hours of light exposure. This way, when the time comes to grow them, you will know where to put them. We recommend planting in several places, so you will know where they are best suited and for the following year you will know where to put them.
So far this article on how to grow autoflowering plants outdoors, we hope we have solved all your doubts, but if not and you have any questions, you can contact us by email at info@themariashop.com or through our social networks.