If you’re looking for information on how to grow psychedelic mushrooms for mycological study, you’re in the right place.
In this post, we explain step by step how to successfully cultivate magic mushrooms.
In our online store, you can buy psychedelic mushroom grow kits at the best price and in a completely legal way!
Methods for Cultivating a Magic Mushroom Grow Kit
There are several ways to grow magic mushrooms, and in this post we are going to show you the easiest one, which consists of moistening the substrate, placing it in the grow bag or propagator, and providing the right conditions for it to fruit.
Cultivation of magic mushrooms in a bag
When we buy a magic mushroom kit, most of the time it includes a grow bag, in which we can cultivate our mushrooms without any problems.
Cultivation of magic mushrooms in a propagator
Growing in a propagator is easier, as we can buy electric ones (which provide heat) or use heating mats.
Additionally, they are larger than a bag and more convenient when it comes to turning the substrate, although we shouldn’t handle it too much.
Another advantage of propagators is that they include one or more windows, which we can open or close, allowing us to aerate the growing area more easily.
Materials needed to grow mushrooms
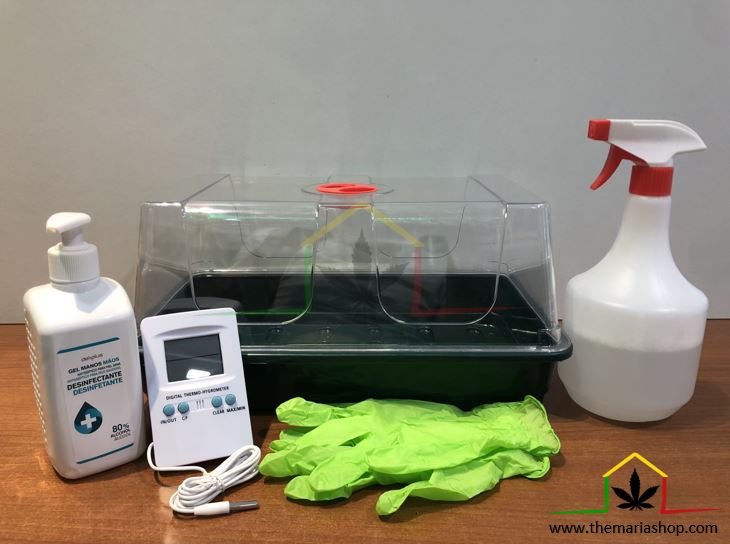
The truth is, to grow magic mushrooms at home, we don’t need much equipment, but we’ve prepared a list of the basic materials needed for a successful cultivation:
Magic mushroom substrate
Grow bag or propagator
Digital thermo-hygrometer
Gloves
Clean water spray bottle

Necessary parameters for growing magic mushrooms
The right parameters are those that will allow us to achieve the best results in cultivation. But it’s not just that—if we don’t maintain the necessary temperature and humidity or provide the optimal light, it’s possible that the mushroom substrate won’t fruit.
Light
Light is a very important factor in mushroom cultivation. It can be sunlight or white light, but under no circumstances should it shine directly on the mushroom substrate. It should be indirect light, illuminating the grow room or area, but we should never expose the substrate to direct sunlight or place it under a grow lamp or neon light.
If we use artificial lights, it is advisable to use white light and provide roughly the same number of hours of light as natural daylight. When growing mushrooms or magic mushrooms, we should simulate the conditions of a forest in the middle of autumn, so we shouldn’t give them too many hours of light either.
Temperature
Temperature is another important factor when growing magic mushrooms. The cultivation should be kept between 22 and 24ºC (ideal: 23ºC). If the temperature is not stable and optimal, it can prevent the mushroom substrate from fruiting. Make sure to keep the substrate at a consistent temperature, using an electric propagator or heating mat if needed.
Humidity
Humidity is perhaps the most important factor for activating the mycelium and allowing magic mushrooms to sprout. The optimal humidity range for cultivation should be between 60–80%.
Step-by-Step Magic Mushroom Cultivation Guide
Step 1: Disinfecting the Grow Room and Tools
For a successful magic mushroom cultivation, we must follow and maintain the parameters mentioned so far. Another important factor is cleanliness and disinfection. Before handling anything, we should disinfect our hands and the room where we plan to place our magic mushroom kit.
To avoid contaminating the substrate, it is advisable to use latex gloves. It is also very important not to smoke or use air fresheners in the room where the mushroom kit is kept, as this could be fatal for them.
Step 2: Prepare the Grow Bag or Propagator
Once everything is disinfected and you’re wearing gloves, proceed to prepare the grow bag or propagator. Find the ideal spot to place the cultivation kit; remember, there should be light, but not direct.
Pour mineral water (never tap water) into the bag or propagator—about one glass should be enough. This water is only meant to create condensation inside the bag or propagator, increasing the humidity.
The water should never come into contact with the mushroom substrate, and ideally it shouldn’t touch the substrate at all, as cold water can prevent it from fruiting. It is recommended to elevate the substrate above the water, for example by placing a couple of glasses underneath it.
Step 3: Hydrate the Mushroom Substrate
The magic mushroom substrates you’ll find at Themariashop come fully prepared and hydrated, so all you need to do is spray the entire surface with mineral water (never tap water).
Remove the lid from the substrate and, using a clean spray bottle, mist the surface until it is completely moist.
Important: Never pour water directly onto the substrate—only mist the surface. Spray just once and never spray directly onto the mushrooms or primordia.
Step 4: Place the Mushroom Substrate in the Grow Bag or Propagator
Once the surface has been sprayed with water, place the mushroom substrate—without the lid—into the grow bag or propagator. Remember, it’s best if the substrate does not come into contact with the water.
After placing the substrate inside, insert the probe of the digital thermo-hygrometer and close the bag or propagator.
Steps to Follow During Cultivation
Once all the steps are completed, we must maintain our cultivation properly to ensure everything works correctly.
Open the bag or propagator for a couple of minutes each day to allow for oxygen exchange. Doing this twice a day (morning and evening) is ideal.
Change the water in the bag or propagator at least once a week, as stagnant water can spoil and contaminate the mushroom substrate through condensation.
Pay attention and try to prevent water condensed on the walls of the bag or propagator from dripping onto the substrate.
Keep the temperature and humidity constant at all times.
Always wear gloves before touching the bag or cultivation kit, and if possible, use a mask.
Avoid direct exposure to light or sunlight.
Cultivation Time for a Mushroom Substrate
The first mushrooms will start to sprout between 10 and 15 days after the mycelium becomes active, although this may vary depending on the strain. Once the mushrooms begin to appear, they grow very quickly, so they can be harvested for study within 3 to 4 days after they start emerging.
When and How to Harvest Magic Mushrooms
Mushrooms should be harvested before the cap fully opens.
To harvest them, put on gloves and simply pull them upward while giving a slight twist to remove them.
How Many Crops Can Be Grown from a Magic Mushroom Substrate?
If we take good care of our magic mushroom substrate, we can achieve 3 to 4 crops, although professional growers have managed to get up to 8 harvests.
To encourage the substrate to fruit again, remove all the mushrooms and mist it with cold mineral water.
Once this process is done, place it back into the grow bag or propagator.
Important: Mushroom kits are only intended as spores for exclusive use in mycological study, ethnobotanical research, or ornamental purposes. They are not for agricultural or food use. Themariashop is not responsible for any illegal use that third parties may make of these kits or spores.


